Tuesday 24 December 2013

Happy Holidays

Wow I can't believe it is Christmas Eve already boy has this year has flown by, however you are spending the Holidays I hope you have a lovely time!

Here are a few more Christmas cards, enjoy...


Friday 20 December 2013

Christmas Cards

I think I am almost there with my Christmas cards only a couple left to give out, so here is a look at one of them.....


That's all for now as today it the last day of school and I have one very excited Little Lady as this means Father Christmas is closer to arriving!

Saturday 14 December 2013

Nina Crafts: Owl Tree

When I saw the Owl stamps from Nina Crafts I knew I wanted to have one peeking out of a tree, and luckily on one of my many visits to craft fairs over the years I had bought some wood veneer pieces and I just had to use it.


The outside of the card is just so simple. I trimmed down  a piece of "wood" to fit the front of an 14.5cm card and cut out the "hole" using the Christmas wreath Movers and Shapers from Tim Holtz. I then distressed it.

Next I stamped the saying onto a scarp of card and trimmed it down, distressed it and attached it to the "wood" using brads. I then attached this to the front of a green card which had been distressed. I then lined up the wreath die again and cut through the card.

I then stamped the Feathery Owl onto some patterned paper, cut him out leaving a slight border, distressed him added some colour. Onto a a 13.5cm square piece of cream card I stamped "Happy Birthday" (from Birthdays galore) all over it and distressed around the edge.

To finished of the card I attached the 13.5cm square card into the base card and attached the owl making sure his eyes lined up with the hole.

Thursday 12 December 2013

Nina Crafts: White Owl

For this card I just used the new Leafy Owl Stamp set from Nina Crafts (and the stitching from Sew Creative). I wanted this card to be just brown, cream and green but looking at it again I think the eyes needed to be black!


To make this card I stamped "Have a Hoot!" all over an A5 white base card and distressed it lightly in green. 

Next I stamped the Leafy Owl  onto pattern green paper and also onto Kraft Card. I cut out the green owl and coloured in his leafy bits. Out of the Kraft card owl  I cut out his wings, beak, feet and eyes and ears. I stuck these onto a small piece of cream and stamped stitches around the edge and distressed it slightly. This was then mounted onto Kraft Card and stitching added around the edge.

To finish of the card I added a piece of torn green patterned paper across the base card and added some lace and ribbon. The owl was then attached and Card Candi added to the eyes. 

Tuesday 10 December 2013

Nina Crafts: Christmas Hoots

I have been busy making my Christmas cards and I just had to make some using the Feathery Owl, stamp set from Nina Crafts....


To make this card I started by cutting a 7 inch square white card and stamped the owl off center to the right. Next I masked him off and stamped the holly garland from the "All things Christmas" stamp set, once across each corner then filled in any gaps . I then stamped some straight lines to form a branch and "Season's Greetings" from Grand Word Perfect next to the owl. I then coloured it in.

Next I distressed lightly around the edge of the card, to the Poinsettia and Holly Berries I added Glossy Accents and some Stickles to the white Roses.  Once it was dry I mounted it on to some patterned backing card and attached a ribbon before mounting it onto an 8 inch square Kraft card.

Finally I added two metal corner embellishments and some card Candi for eyes!

Wednesday 4 December 2013

Nina Crafts: Book Owl

I have had the new owl stamps from Nina Crafts for weeks, just sat on my crafty desk wanting to play but other things have jumped in front of them on the to do list (How rude! I hear you all cry!). 

BUT, I finally got to play and I have had soooooo much fun, so watch this space as there are many more ideas to come.......

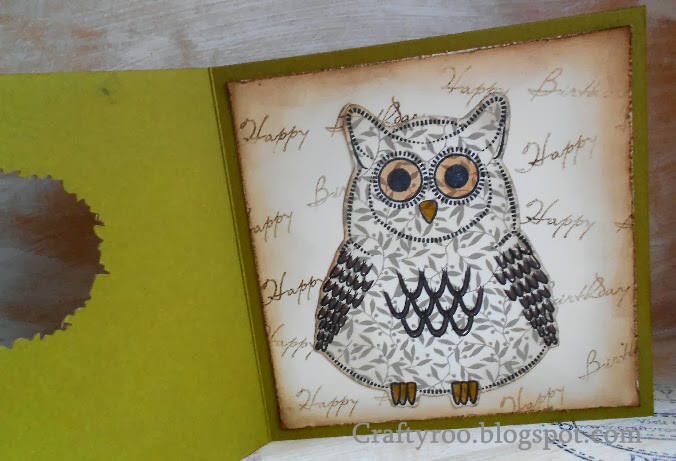
This first card I just love he really is a wise old owl!!


To make this card I just used the Leafy Owl stamp set, but it would work with any of the three owls. 

I started by stamping the owl into a page of a book in black ink and just coloured in the leaves, branches, eyes, beak and feet. He was then cut out leaving a 1-2mm border and distressed lightly around the edge. I then stuck him onto some green patterned paper and cut him out again leaving a 1-2mm border and lightly distressed around the edge.

Next I cut a 5 inch square piece of kraft card and embossed down the right hand side of the card and distressed it. I then cut a page from a book to fit the 5 inch kraft card and tore down the right hand side and distressed it. I then stuck this to the kraft card.

In each corner I attached a bronze large brad and tied some string around the left hand side. This was then attached to a 14.5 cm square green base card.

To finish of the card I attached the Leafy Owl and stamped "Have a Hoot!" onto a scrap of cream card, trimmed it down, distressed around the edge and mounted it onto green card and attached it to the card.

Stay tuned I have been playing (sorry) making lots...........

Sunday 1 December 2013

A day off!!!!

Today is my first Sunday "off" in what feels like forever, the plan to spend all day with Little Lady and Mr Crafty Roo. However, Little Lady remembered she HAD to have a bag for forest day, so my quiet Sunday turned into a sewing frenzy......


Little Lady chose the fabric herself, got me another bag that was the perfect size that I could use as a pattern and she drew me exactly what it had to have on the front.


I know I only put on one tree but she doesn't seem to have noticed and asked why that particular fabric? "because it looked like a muddy puddle" guess I can't argue with that! 

Now we are off to paint decorations, sort out our talk time book and make a mobile! So much for a quiet day lol!

Friday 29 November 2013

In dreams....

This frame is hot off the craft desk!


I was sorting my stock for tomorrows market and realised I didn't have many frames made. At first I wasn't too sure about the bright purple frame, but as I started working on the centre I began to love it!

The saying "in dreams we catch glimpses of life larger than our own" is one of my favorite sayings.

Glossop Handmade Christmas Craft and Gift Market

This weekend we are off on our travels again, this time we are in Glossop at the Central Methodist Church, Chapel Street, Glossop, SK13 8AT. 

So if you are passing by why not stop by and say "hi"


Saturday 23 November 2013

Blakemere Craft Fair


This weekend we are at the Blakemere Artisan Food and Craft Market between 10am and 4pm both days. 


If you are passing why not drop by, say "hi" and check out this fabulous place, you might even get to meet Father Christmas and his donkeys.


Here is a sneaky peep at a couple of the lovely ceramics we have for sale this weekend!


Friday 22 November 2013

Nina Crafts: Hoppy Birthday

It was my friends little girls birthday a week or two back and I couldn't resist using my Tufty Wishes and Birthday Galore stamp sets from Nina Crafts

I am so pleased with how it turned out!


And I hope you are sitting down as I even remembered to take a photo of the inside too......


 To make this card I started by cutting a piece of cream card 2cm smaller than an A5 card. Into the center of the card I stamped Tufty. Then around the edge I stamped "Happy Birthday" and in the corners I stamped the stars twice. I then coloured this in and rounded off the edges using a corner punch. This was then mounted onto purple card.

Around the edge of a blank cream A5 card I stamped the stars, coloured them in and rounded of the corners. I then attached the stamped image.

For the inside I took an A4 pale piece of cream, folded it in half, trimmed it down to go inside the card and trimmed of the corners. Around the edge I stamped the stars in a pale pink ink and on the left hand side I stamped Tufty again and coloured her in using very pale colours this time!

To finish off the card I attached the insert to the inside of the card then tied some purple ribbon around the front. 

Wednesday 20 November 2013

Crazy days!

This week is a lot like being on a giant roller coaster, with incredible highs and terrible lows!!!

So lets start with the highs, last weekend we were at the fabulous Ross Papercrafts show in Sheffield, it was lovely to meet so many of you and also catch up with those of you we had met earlier in the year, and stopped by to share your lovely crafty makes!

Also we are off on our travels again, this time to Blakemere Village and we will be having a stand at their Artisan Market selling our beautiful hand painted ceramics, hand stamped fabric bags and much much more.


So if you are near by why not come and check it out, Father Christmas will be there with his donkeys. To find out more visit their website www.blakemerevillage.com/christmas.

And as for the lows my little lady is poorly sick! She is never sick and this bug has seriously knocked her for ten, to a point where she doesn't even have the energy to craft! Shocking I know!

And the worst part of all, is she is desperate to go to school as she is missing doing her work!!!! Bless hey!

Friday 15 November 2013

Ross Papercrafts Sheffield

I am busy playing boot Tetrus again (aka loading the car!) for another fabulous Ross Papercraft Show. This weekend we are at Westfield Sports College........


So if you are nearby why not stop by and say "hi" we would love to see you!

Friday 8 November 2013

Quick and easy Christmas cards.....

I just love these quick and easy Christmas cards as they look stunning and take a matter of minutes to make!


For those of you who are none believers, I kid you not, a lady at the recent Ross Papercrafts show timed me as she didn't believe I could make a card (any size!) in less than 3 minutes, well these beauties take just over two minutes to stamp and assemble!!!!!

So why not give it a try......

Start by cutting your all your card to size for an 8 inch square card you will need: 8 inch square cream base card, 7 1/2 inch square piece of coloured card for the mat (same colour as your ink) and  a 7 inch square piece of cream card.

(A5 card: A5 cream base card, 14.8 by 20 cm piece of coloured card for the mat and  a 13.8 by 19 cm piece of cream card.)

 
Next create your template, to make mine I drew around a festive chipboard shape and cut it out. Alternatively you could use your festive die cuts or masks.

Then attach the template to the 7 inch square piece of cream card using low tack tape.


Using the cog arrangement stamp from the Mini Cog Corners stamp set "fill in" the template, making sure you over stamp on all the edges.

When you are happy you have filled the template, remove it carefully.


In each corner stamp the corner stamp. And mount it onto the  7 1/2 inch square coloured piece of card.


Around the edge of the 8 inch square card stamp the small cog arrangement, when stamping make sure some of the image is stamped off the card.


To finish off the card attached the mounted coloured card onto the base card. 

The cards look great left blank like this one or with added embellishments.


The stamp set used to make these cards is called Mini Cog Corners and is available from Crafty Roo Designs and is only £3.00 including P&P. 


Or you can buy the stamp set and 5 festive chipboard shapes to make your templates for £4.00. 

 
(Shapes may vary!)

Wednesday 6 November 2013

Thank You!!!

Just a quick THANK YOU to all of you who stopped by the Ross Papercraft Show last Sunday at Rainton Meadows, we had a fabulous time and I don't think I have ever made soooo many Christmas cards in 5 hours!!!!! 

For those of you who couldn't come along here's what you missed.....


As promised to all the lovely ladies and gents that stopped by our stand to watch a quick and easy Christmas cards being made, I will be posting the details of how they are made on here shortly (just in case anyone forgot!).

Saturday 2 November 2013

Ross Papercrafts

Tomorrow we will be hitting the road once more, on our way to another fabulous Ross Papercrafts show this time we are in Tyne and Wear....


And we are definitely in the festive mood, we have transformed our stand to a Christmas Wonderland and will be busy making....

Crackers


Bottle tags


And if like me you haven't started to make your Christmas cards yet, we will be making some stunning Christmas cards in less than 5 MINUTES!!!!!

I'd show you a picture but the cards are all ready packed away (whoops!).

So if you are anywhere near Tyne and Wear tomorrow please stop by and say Hi!

Thursday 31 October 2013

Bag Charm

This bag charm was another commissioned piece I recently finished. I love making these as every time I make one they turn completely different!

The brief for this project was cats with a splash of purple.......


And if you were wondering yes they are bottle tops which have been sanded, primed, then primed again, painted, stamped and finally glazed!!!

Remember if you would like something made just for you, why not visit our website 

Friday 25 October 2013

Nina Crafts: A Cracker of a Christmas

Here is another card made using the new stamps from Nina Crafts this stamp set is called Cracking Christmas and All Things Christmas. Isn't Cecil a little cracker! (I couldn't resist lol!)


To make this card I stamped Cecil onto a piece white card and stamp the dots from All Things Christmas around the edge. he was then coloured in and distressed. Cecil was then mounted onto some green card.

I then stamped the sentiment onto a small piece of white card and the dots around the edge again and coloured them in to match Cecil.

Next I attached the sentiment to Cecil by punching four small holes (two on each hands) to make it look like Cecil is holding the ribbon. I then punched two holes along the top of the sentiment and threaded some ribbon through. I love how this worked as the sentiment moves!

Onto the bottom of a DL card I attached some patterned paper and attached Cecil centrally to it.

To finish off the card I added Glossy Accents to Cecils glasses and Stickles to every other dot around the edge of Cecil and the sentiment.

Wednesday 23 October 2013

Nina Crafts: Merry Mavis

Here is another card I made using the new stamp sets from Nina Crafts, this one is called Mullered Mavis Christmas Party.

 I had real fun making this one!


To make this card I started my the sentiment diagonally across blank white DL base card in pink and distressed around the edges.

Next I stamped Mavis onto white card and added a few of the stars from All Things Christmas in each corner and onto the base card too. I then coloured  it in and mounted it onto black card that I had added embossing powder around the edge.

I then stamped the sentiment onto a small rectangle of card splitting it onto two lines and added that to onto black card that I had embossed around the edge of.

Mavis and the sentiment were then attached to to base card and then I went wild with Glossy Accents and Stickles! 

Monday 21 October 2013

Nina Craft: Cracking Christmas

Whoops, I forgot to add the last few samples I made using the new stamps from Nina Crafts, I get distracted far too easily!!!!!

Any how here is a really simple card card I made using the Cracking Christmas, All Things Christmas and Baubles Galore stamp sets!


To make this card I started by stamping baubles all over the top part of a white piece of card that is slightly smaller than A5, coloured them in and distressed around the edge. across the bottom I scrunched up some washi tape. This was then mounted onto a red card.

Next I stamped Cecil onto a small piece of white card around the edge I stamped the stars from All things Christmas and coloured everything in and distressed it . This was mounted onto a piece of  red card and attached to the main card. Finally I added Glossy accents to his glasses.

Tuesday 15 October 2013

Sssssssshhhhhhhhhh

Here is a sneaky peak at some wooden magnets I have been working on.........


Each one is hand painted.......


Stamped and distressed.....


And features a wonderful Dr Seuss saying.......


These little beauties will be on sale this Saturday (19th October) at the Romiley Craft Fair, so if you are in or around Romiley this Saturday please pop by and say hi! 

Or they will be appearing on on our website very soon!


Sunday 13 October 2013

Vision Board

So I can finally share this monster of a project, I don't mean it was hard or horrible to do, it was just huge!!!!!!! Every time I did any work on it is seemed to grow another inch lol, well maybe not, but that's how it felt!!!!

Anyway my brief for this project was to create a vision board, featuring a logo (Arbonne) and I was given some some pink butterflies made out of feathers...... well, I had never heard of vision boards used other than when re-designing rooms or buildings! So after a good old look around I decided that maybe a board wasn't quite the right thing to do as once you started pining things to it you would lose the logo! And, after all if you go to the effort of having something made and wanting a logo on it you might as well see it, right?

So it's amazing what you can make using an embroidery hoop and wooden pegs!!!!! 


Each peg was lovingly painted, stamped, distressed, drilled and screwed - yep you read that right I GOT TO USE POWER TOOLS!!!!!!! How cool!

So, if you fancy challenging me to make something totally unique why not check out my website www.craftyroodesigns.co.uk 

And I know want you all want to know, and the answer is yes the person it was for loved it!!!!!!!!

Saturday 12 October 2013

Nina Crafts: Granny kisses are coming to town!!!!!!

I love this card I had such fun making it and every time I look at it it makes me smile! What more can you ask from a card?

For this card I used the new stamp set from Nina Crafts Love and Marriage under the Mistletoe.


To make this card I stamped and coloured in Love and Marriage under the Mistletoe.

Next I cut two 14cm square cards one in red and the other in green and stuck them together to create a tri-fold card. Onto all the sides (except the back centre one) I added some pattern paper and some co-ordinating washi tape.

Then I created the text and mounted these onto card leaving a slight border and one of them to each side (except the centre panel).

Onto inside centre panel I attached the stamped image which had been matted and layered a few times. And to finished it off I added card candi, Glossy Accents and Stickles!!!!!!

Monday 7 October 2013

Nina Crafts: Balloons away!!!

When I saw the new stamp set from Nina Crafts called Baubles Galore I immediately got the idea for this card, and I just couldn't shake it until I had made it!


To make this card I stamped the two round baubles onto a small piece of white card and masked them off. next I created the background by Using distress Inks and a water brush.

When I was happy with the background I removed all the masked and coloured them in using Distress Inks again. Once it had dried I then stamped "Thinking of You" from the Occasions stamp set. I than mounted this onto some dark brown card and tied some string around it.

Next onto a 6 by 6 inch square Kraft card, across the bottom of the card I added some pattern paper. Onto this I then attached the balloons.

Thursday 3 October 2013

Nina Crafts: Have a drink on me....

This money wallet is a template I have had for years, so when I saw the new Mullered Mavis' Christmas Party stamp set from Nina Crafts I just had to dig it out of the cupboard!!!! 


To make this money wallet, I started by cutting it out from some patterned thick paper, then measured the front and cut a piece of white card to fit. Onto it stamped Mavis. I then masked her off and stamped the stars from All Things Christmas Stamp set down the two edges. Across the top I stamp "Have a drink" and across the bottom I stamped "on ME!!!" Using ABC 123 stamp set. I then coloured it in and distressed around the edge.

Next I stamped Mavis again onto the inside of the top flap, masked her off and stamped a border of stars around the edge. This was then coloured in too.

Around all the cut edges I added Washi Tape to tidy up the cut edges and fixed the wallet together.

Onto a small scrap of white card I stamped a bow (also from All Things Christmas) and used it as a fastener for the wallet.

Finally I attached Mavis to the front of the wallet and added Glossy Accents to the baubles and glasses, and Stickles to the tinsel!

Tuesday 1 October 2013

Nina Crafts: Mistletoe Kisses

Last week I got to play with the new stamps from Nina Crafts the stamp I used for this one is called Love and Marriage Under the Mistletoe.


To make this card I stamped Mr & Mrs onto white card and then trimmed it down to the smallest square possible. I then coloured in the image (I am not great at colouring in, so just don't look too closely!)  and distressed around the edges.

Next I raided my Christmas papers until I found the background, tied some bakers twine around the base of the stamped image and attached it to the background paper using some over sized brads.

I then attached that to a Kraft card.

I was really pleased with how it turned out and, it was really quick to make! 

Friday 27 September 2013

Ross Papercrafts

So we are off on our travels again, tomorrow we will be at 


at Doncaster Deaf Academy, Leger Way, Doncaster, (opp. Racecourse), DN2 6AY  from 10.00am till 3.00pm!

So if you are near by why not stop by and say Hi we would love to see you!

Sunday 22 September 2013

Simple Butterfly

What another crazy week I have had, everyone kept telling me I would have loads of time to get my jobs done now Little Lady is out every afternoon but, no joke I seem to have less time! 

I have also been working on some samples for Dimension Stamps which I have to get in the post early this week so watch this space..... 

Also I am working on a couple of commissioned pieces it's all very exciting, as for two of them I haven't been given much direction so I am free to play and try new things out! So hopefully once I have finished them I will be able to share them too!!!!!

Anyway, here is a card I made a while ago using rub-ons and watered down distress inks, it is quite messy (well it is when I do it) but it is great fun to do, as you don't know what it is going to look like till is dries. I saw it used on one of Tim Holtz tags and it made me dust off my box of rub-ons!


To make this card I cut a piece of white card slightly smaller than a DL card and onto the bottom of the card I filled it using birthday related rub-ons. When it was filled I then "splodged" some Distress Inks onto a glass mat and spritzed it and placed the card into it making sure all the card was covered in ink. The card was then removed from the ink and dried it (with the remaining ink I kept watering it down and placing card into it to make some backing papers!).

Next I stamped the Baby Butterfly onto some white card, cut it out and distressed it. Then I attached some wire and a couple of beads to a small safety pin to make the body and antenna of the butterfly.

Once the background card was dry I distressed around the edges, and added some lace and ribbon across the card just above the rub-ons. This was then attached to a Black DL card and I added a pink brad to each corner.

To finish off the card I added the butterfly and the safety pin body.